프래그먼트(Fragment)
허준영(jyheo@hansung.ac.kr)
출처: https://developer.android.com/guide/components/fragments.html?hl=ko
프래그먼트(Fragment)
- 액티비티 실행 중에 추가 및 제거가 가능한 모듈식 UI 섹션
- 여러 개의 프래그먼트를 하나의 액티비티에 조합하여 UI를 구축할 수 있음
- 프래그먼트 구현 클래스를 여러 액티비티에서 재사용할 수 있음
- 프래그먼트는 자체 수명 주기를 가지고, 자체 입력 이벤트를 받음
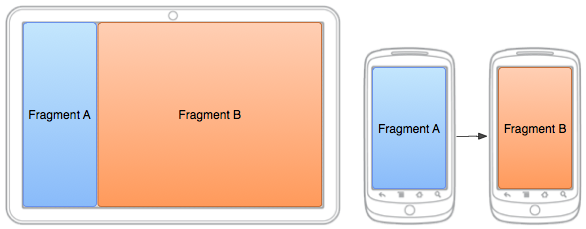
프래그먼트 디자인
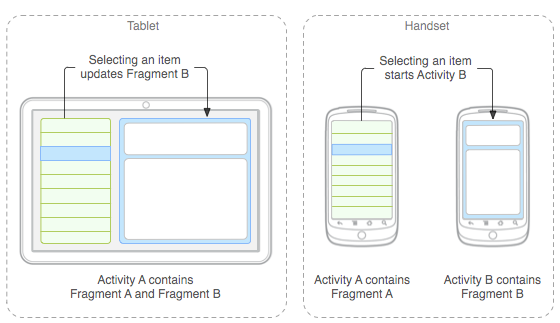
- 태블릿과 같은 큰 화면에서 유연한 UI 디자인을 지원
- 프래그먼트는 재사용 가능하며, 다른 UI요소처럼 액티비티의 구성 요소가 됨
- 재사용을 염두에 두고 디자인하며, 한 프래그먼트를 또 다른 프래그먼트로부터 직접 조작하는 것은 삼가
- ViewModel 등을 이용하여 프래그먼트 간의 데이터 교환
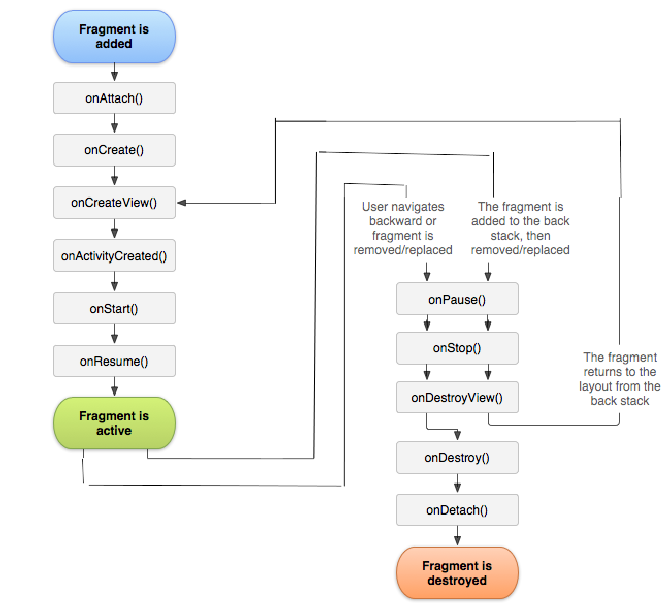
라이프 사이클
- onAttach:
- 프래그먼트가 액티비티에 연결
- onCreateView:
- 프래그먼트의 레이아웃을 생성
- onActivityCreated:
- 연결된 액티비티의 onCreate가
완료된 후
- 연결된 액티비티의 onCreate가
Library dependency in gradle
- gradle (app)
  dependencies {
      ...
      implementation 'androidx.fragment:fragment:1.2.4'
  }
프래그먼트 클래스
- Fragment를 상속 받아서 생성
public class FirstFragment extends Fragment { public FirstFragment() { // Required empty public constructor } @Override * public View onCreateView(LayoutInflater inflater, ViewGroup container, Bundle savedInstanceState) { // Inflate the layout for this fragment (layout/fragment_first.xml) * return inflater.inflate(R.layout.fragment_first, container, false); } } - Android Studio에서 File > New > Fragment 에서 간단히 추가할 수 있음
프래그먼트 레이아웃
- layout/fragment_first.xml
- 액티비티의 레이아웃과 동일한 방법으로 작성
<LinearLayout xmlns:android="http://schemas.android.com/apk/res/android"
    xmlns:tools="http://schemas.android.com/tools"
    android:layout_width="match_parent"
    android:layout_height="match_parent“
    android:orientation="vertical"
    android:background=“#ffff00">

    <TextView
        android:layout_width="match_parent"
        android:layout_height="match_parent"
        android:text="@string/hello_blank_fragment" />
</LinearLayout >
- 액티비티의 레이아웃과 동일한 방법으로 작성
액티비티에 프래그먼트 추가
- 액티비티 레이아웃에 정적으로 추가(activity_main.xml)
  <LinearLayout xmlns:android="http://schemas.android.com/apk/res/android"
      xmlns:tools="http://schemas.android.com/tools"
      android:layout_width="match_parent"
      android:layout_height="match_parent"
      android:orientation="vertical">

      <TextView
          android:layout_width="wrap_content"
          android:layout_height="wrap_content"
          android:text="Hello World!" />

  *   <androidx.fragment.app.FragmentContainerView
  *       android:id="@+id/fragment"
  *       android:name="com.jyheo.fragmentbasic.FirstFragment"
          android:layout_width="match_parent"
          android:layout_height="0dp"
          android:layout_weight="1" />

  </LinearLayout>

프래그먼트 동적 교체
- 프레그먼트 동적 교체
public class MainActivity extends AppCompatActivity {

    void switchFragment() {
        FragmentTransaction fragmentT =
                getSupportFragmentManager().beginTransaction();
        fragmentT.replace(R.id.fragment, new SecondFragment());
        fragmentT.addToBackStack(null);
            // addToBackStack()을 호출해야 백 버튼 누를 때,
            //    이전 프래그먼트로 되돌아가기가 됨
        fragmentT.commit();
    }
}
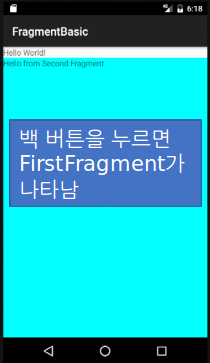
프래그먼트 동적 교체
- 전체 소스
- https://github.com/jyheo/android-java-examples/tree/master/FragmentBasic
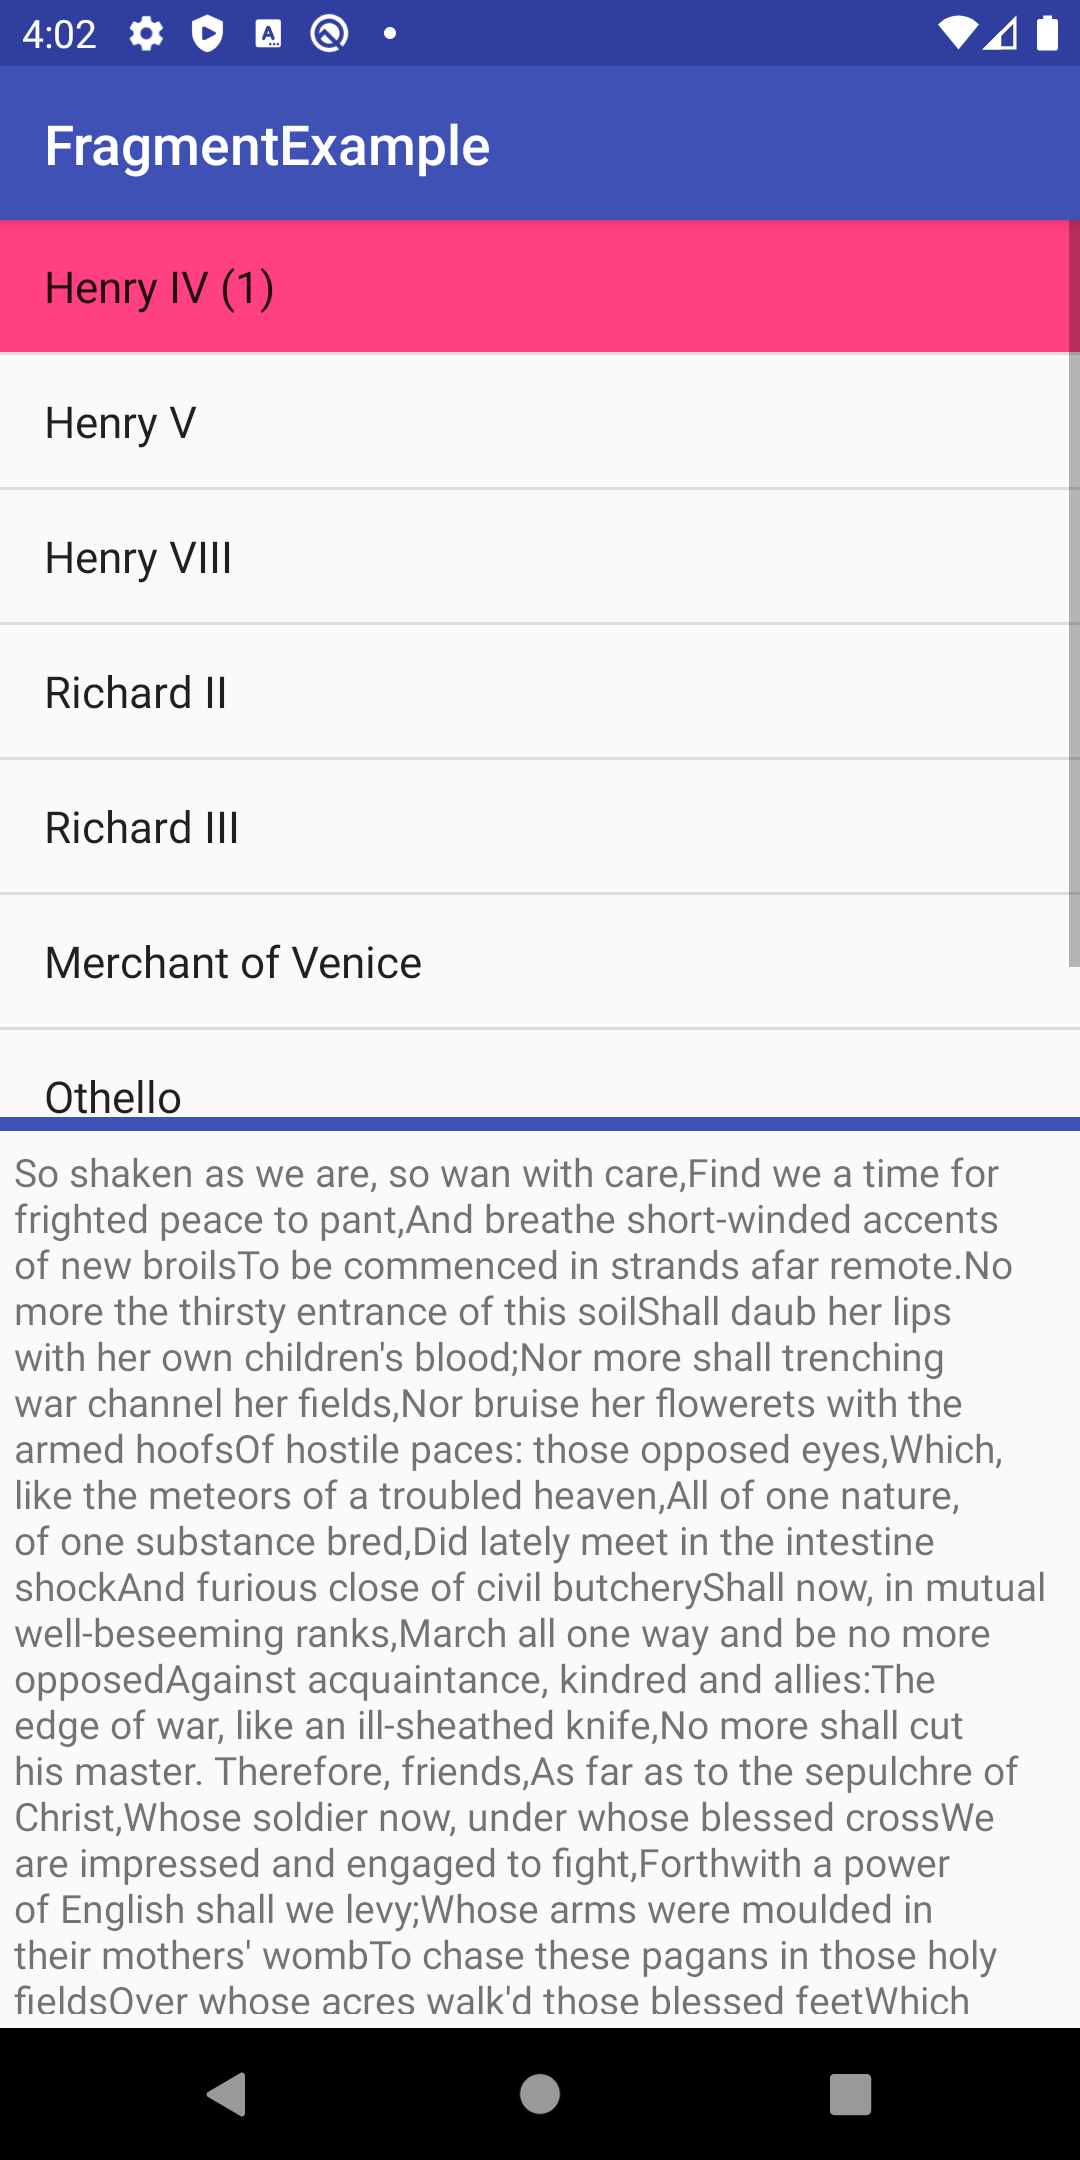
Fragment와 ViewModel
- TitlesFragment와 DetailsFragment
- TitlesFragment 에서 선택하면 DetailsFragment에서 선택한 항목의 내용이 표시됨
- 두 fragment 사이의 데이터 전달을 위해 ViewModel을 사용
- ViewModel을 사용하기 위해 gradle에 lifecycle 라이브러리 추가
  dependencies {
      ...
      implementation 'androidx.lifecycle:lifecycle-extensions:2.2.0'
  }
Fragment와 ViewModel
- ViewModel
- View를 위한 데이터 모델, activity나 fragment와 연관된 데이터 모델
- Activity나 fragment가 완전히 메모리에서 사라질 때 까지 데이터 유지, Activity가 회전으로 다시 만들어질 때에도 데이터를 유지함
- 보통 LiveData와 같이 사용
- LiveData
- Observer 패턴
- 데이터가 변경될 때 자동으로 지정한 객체의 onChanged() 메소드 호출
Fragment와 ViewModel
- MyViewModel.java
  public class MyViewModel extends ViewModel {
      private final MutableLiveData<Integer> selected = new MutableLiveData<>();

      public MyViewModel() {
          selected.setValue(-1);
      }

      public void select(Integer item) {
          selected.setValue(item);
      }

      public LiveData<Integer> getSelected() {
          return selected;
      }
  }
Fragment와 ViewModel
- 액티비티 레이아웃
  <LinearLayout xmlns:android="http://schemas.android.com/apk/res/android"
      android:layout_width="match_parent"
      android:layout_height="match_parent"
      android:orientation="vertical">

      <androidx.fragment.app.FragmentContainerView
          android:name="com.jyheo.fragmentexample.TitlesFragment"
          android:id="@+id/titles"
          android:layout_width="match_parent"
          android:layout_height="0dp"
          android:layout_weight="1" />

      <View
          android:layout_width="match_parent"
          android:layout_height="5dp"
          android:background="#3F51B5" />

      <androidx.fragment.app.FragmentContainerView
          android:name="com.jyheo.fragmentexample.DetailsFragment"
          android:id="@+id/details"
          android:layout_width="match_parent"
          android:layout_height="0dp"
          android:layout_weight="1" />
  </LinearLayout>
Fragment와 ViewModel
- TitlesFragment.java
  public class TitlesFragment extends Fragment {

      private FragmentTitlesBinding binding;
      private MyViewModel model;

      public TitlesFragment() { }

      @Override
      public View onCreateView(@NonNull LayoutInflater inflater, ViewGroup container,
                               Bundle savedInstanceState) {
          binding = FragmentTitlesBinding.inflate(inflater, container, false);

  *       model = new ViewModelProvider(requireActivity()).get(MyViewModel.class);
          binding.listview.setAdapter(new ArrayAdapter<>(requireContext(),android.R.layout.simple_list_item_activated_1,
                                       Shakespeare.TITLES));
          binding.listview.setOnItemClickListener(new AdapterView.OnItemClickListener() {
              @Override
              public void onItemClick(AdapterView<?> adapterView, View view, int i, long l) {
  *               model.select(i);
              }
          });
          binding.listview.setChoiceMode(ListView.CHOICE_MODE_SINGLE);

          return binding.getRoot();
      }
  }
Fragment와 ViewModel
- DetailsFragment.java
  public class DetailsFragment extends Fragment {
      private FragmentDetailsBinding binding;

      public DetailsFragment() { }

      @Override
      public View onCreateView(@NonNull LayoutInflater inflater, ViewGroup container, Bundle savedInstanceState) {
          binding = FragmentDetailsBinding.inflate(inflater, container, false);
          return binding.getRoot();
      }

      @Override
      public void onStart() {
          super.onStart();
  *       MyViewModel model = new ViewModelProvider(requireActivity()).get(MyViewModel.class);
  *       model.getSelected().observe(this, new Observer<Integer>() {
              @Override
              public void onChanged(Integer idx) {
                  if (idx >= 0)
                      binding.textview.setText(Shakespeare.DIALOGUE[idx]);
              }
          });
      }
  }
Fragment와 ViewModel
- 전체 소스
- https://github.com/jyheo/android-java-examples/tree/master/FragmentExample